Social media rich snippets with AngularJS and ngMeta
ngMeta, my Angular1 SEO meta tags library, has frequently seen issues related to the preview snippets or rich snippets generated by Facebook, Twitter, Skype, Whatsapp and others when a URL of an Angular site using ngMeta is shared. I’ve addressed it on Github several times, so I thought I would explain the issue in greater detail here.
Sites like Facebook and Twitter use crawlers to fetch URLs and extract the Open Graph meta values. When Open Graph data is not available, they fall back on the basic meta tags (title, description and others). Social media crawlers generally do not execute Javascript, meaning that they pick up the values provided in meta tags as-is. For sites that use ngMeta, meta tags might look like this:
<title ng-bind="ngMeta.title"></title>
<meta name="description" content="{{ngMeta.description}}" />
<meta property="og:title" content="{{ngMeta.title}}" />
<meta property="og:description" content="{{ngMeta.description}}" />
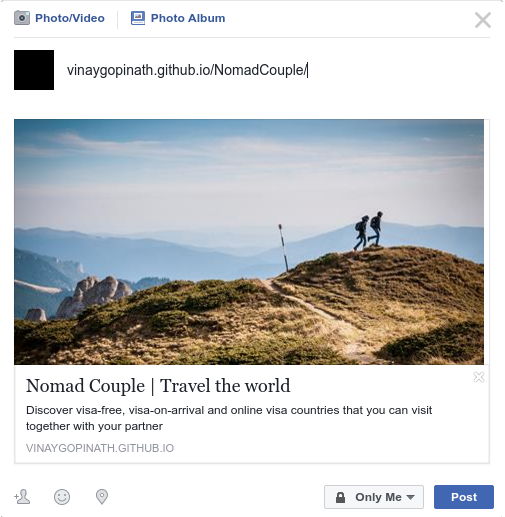
As a result, the rich snippet generated by social media sites is not pleasant (Remember, no Javascript!):

However, Google search’s crawlers do execute Javascript and the search result snippet uses the title, description and other tags set through ngMeta, as expected.
It is technically impossible for a front-end framework library like ngMeta to force crawlers to execute Javascript and pick up the meta content values set through Javascript. Instead, solutions include serving pre-rendered pages, or redirecting requests by crawlers to a specific service that serves a static page with meta tags relevant to the requested URL. For more on the latter, check out angular-social-demo on GitHub.
Another option: If you’re willing to forsake the customization of meta tags for different pages to get rid of uninterpolated Angular expressions like ngMeta.title in your social media snippets, consider adding fallback meta tags that provide a title, description and image for your site. These fallback meta tags must have ng-if="false" so that they are removed in a Javascript-enabled environment:
<title ng-bind="ngMeta.title"></title>
<meta name="description" content="{{ngMeta.description}}" />
<meta property="og:title" content="Site name or other general title" ng-if="false" />
<meta property="og:description" content="Site description" ng-if="false" />
<meta property="og:image" content="https://your-site.com/fallback-snippet-image.jpg" ng-if="false"/>
Feel free to check out the source code of the ngMeta demo site. I’ve just updated it with fallback meta tags.