Tech

Oct 2016

Android app for Torun's city bike system

I’m a big fan of Toruń, and I’ve spent a lot of time exploring the city over the last year. I’m also a big fan of cycling, so when Toruń’s city bike system relaunched in March after its winter hiatus, I took to cycling around the city. As an outsider, it wasn’t always easy locating the nearest bike station. Sometimes, I’d walk to a known station, only to find that there were no bikes. I couldn’t find an app to help me out with the city bike system, so I made one myself that uses the data available on the website.

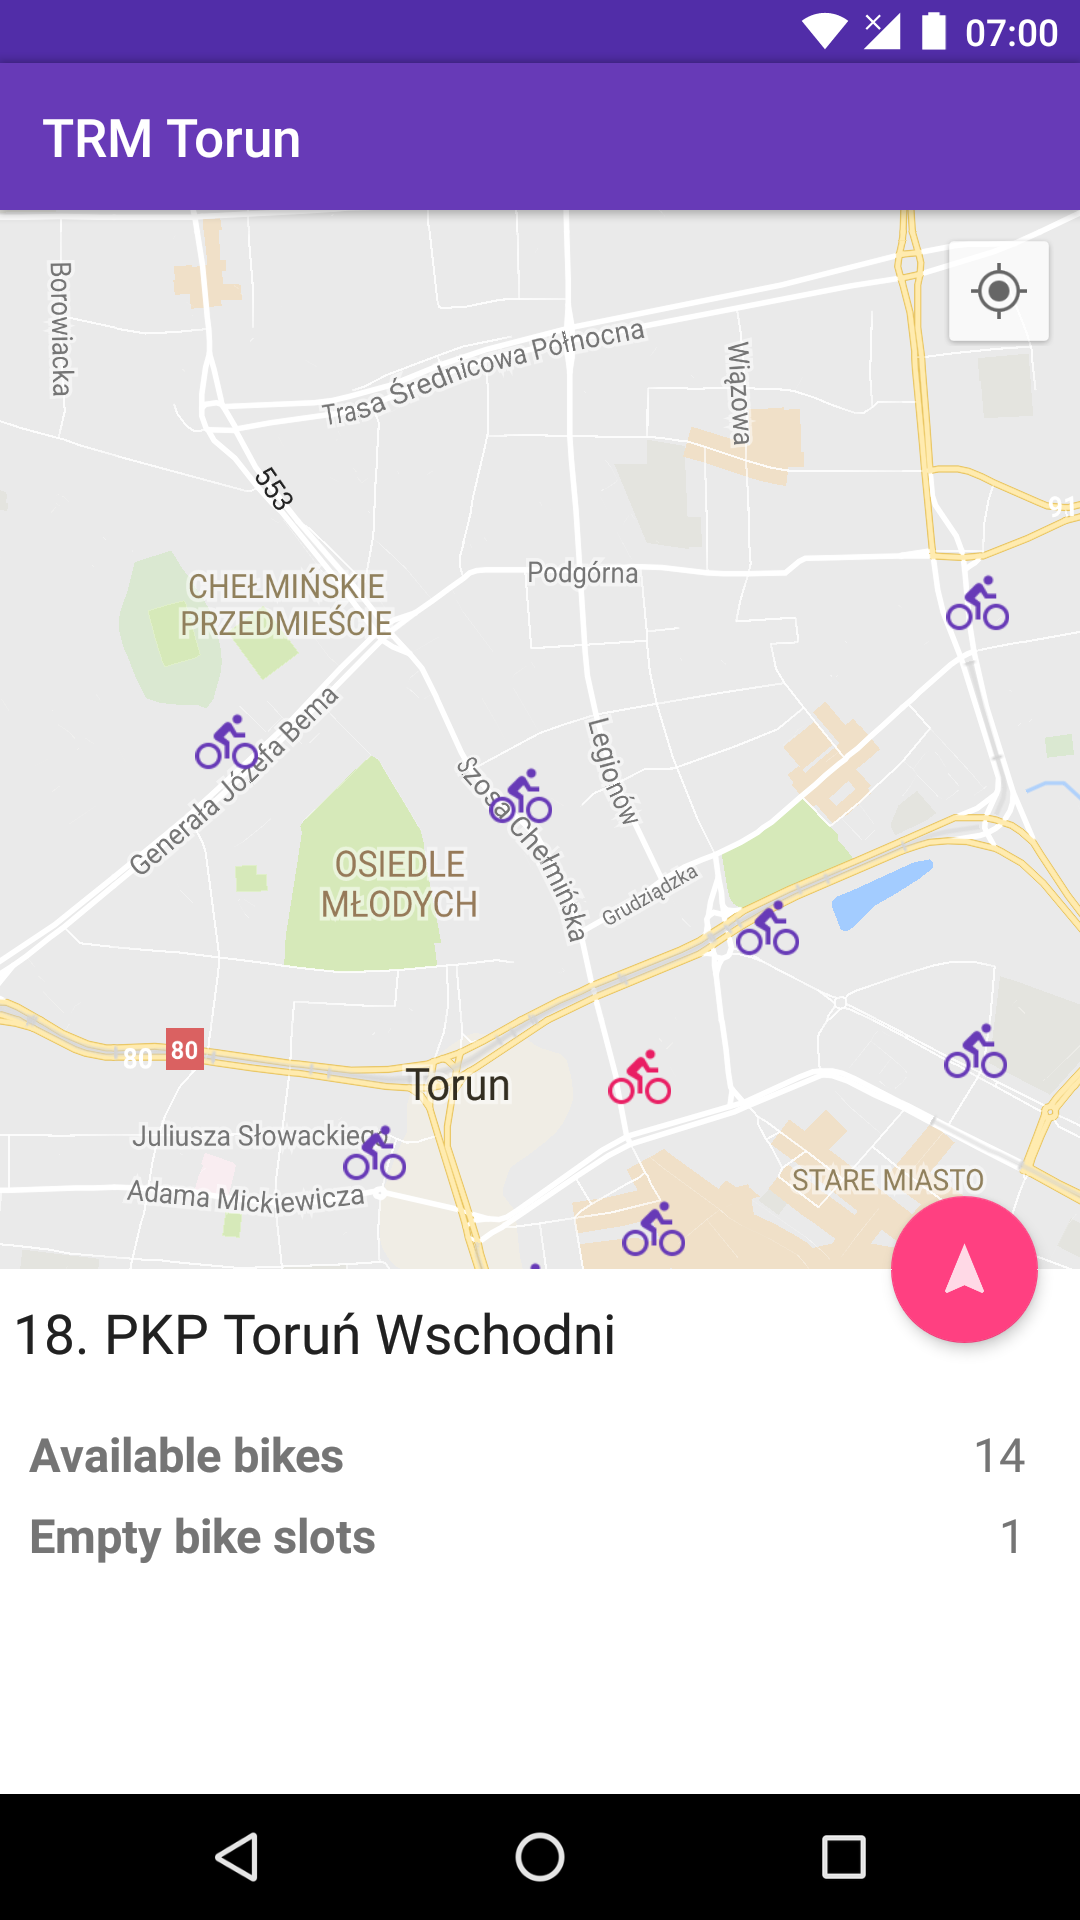
The app uses the Google Maps Android API to show all the bike stations in the city as well as your current location. Using the Locate icon floating action button, you can locate the bike station that’s nearest to you from any location in the city.

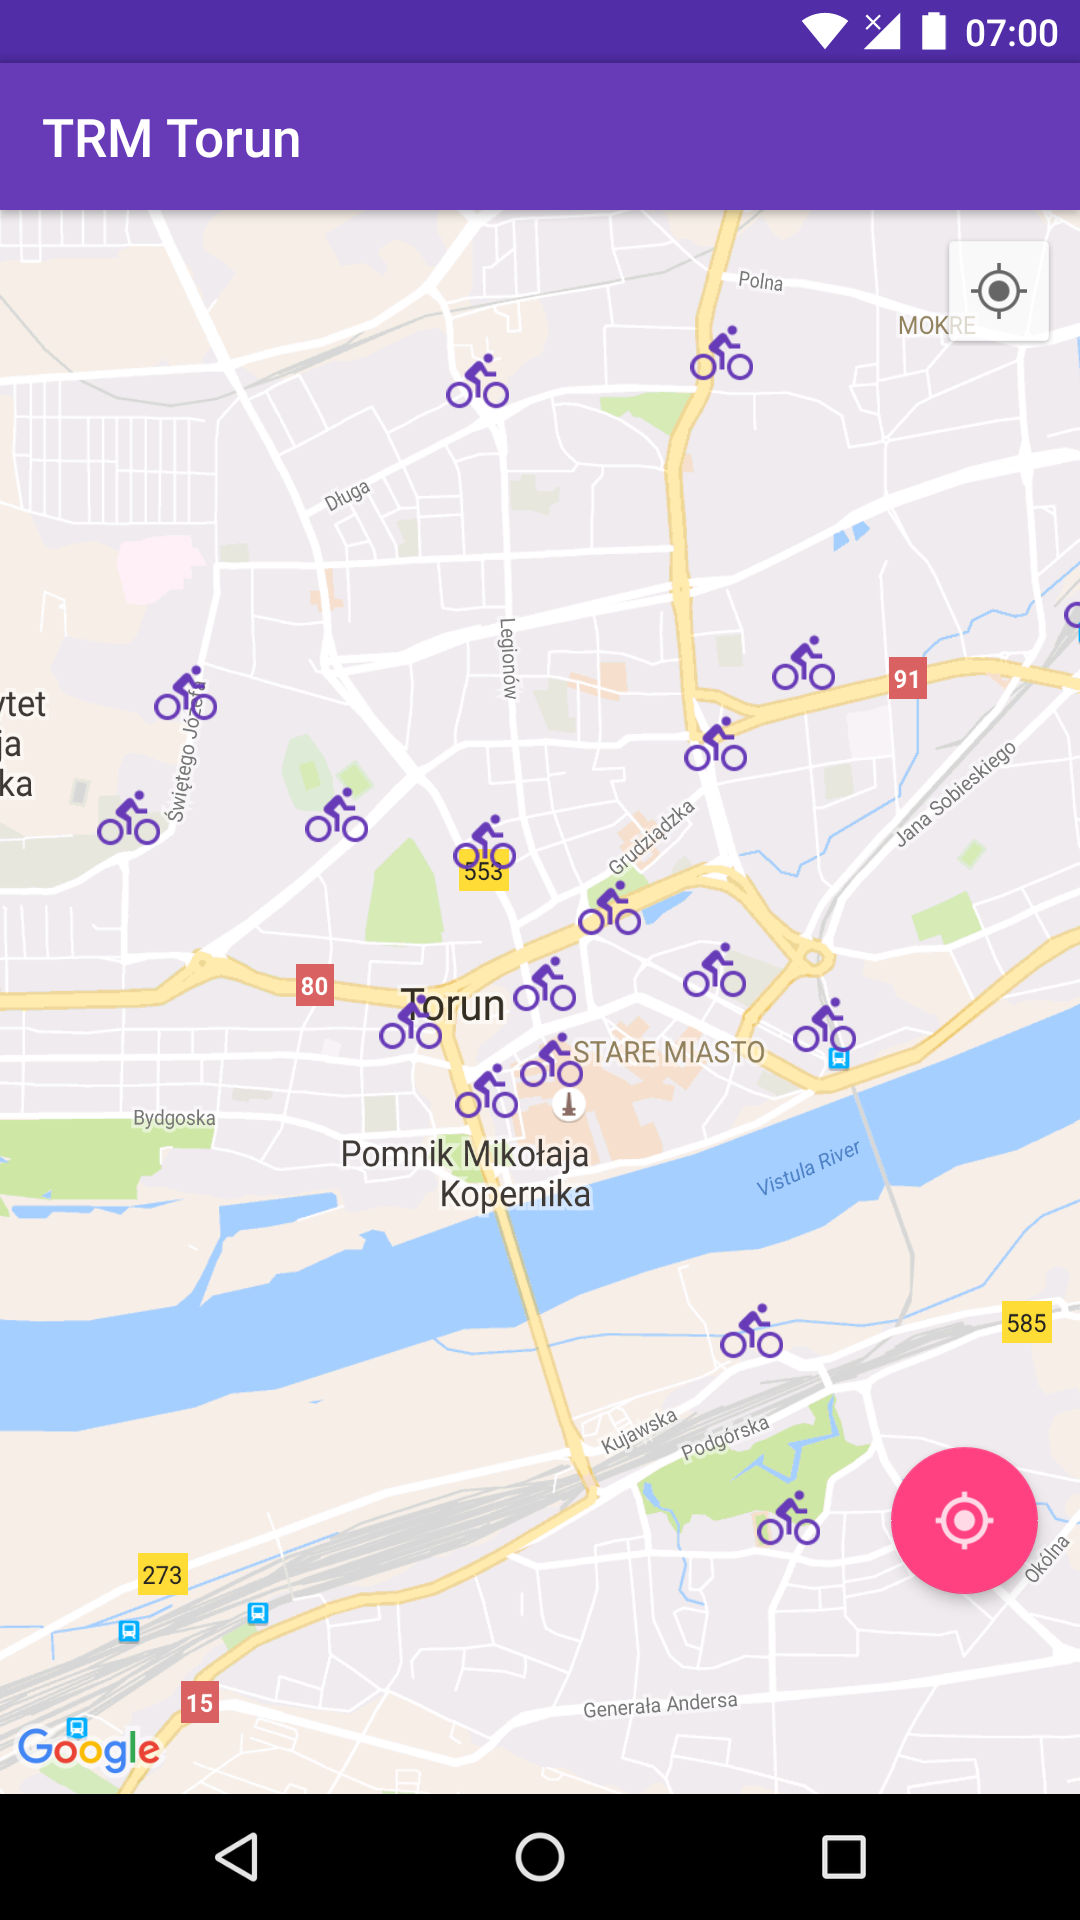
Once you’ve identified a bike station, you can check the number of available bikes, and use the Navigate icon floating action button to get walking directions to the station from Google Maps. The app is capable of working offline, using a cache of bike stations, but, needless to say, realtime bike availability information needs a working internet connection.

Demo

Technical details

The app supports Android 4.0.3 (API Level 15 - Ice cream sandwich) and above, covering 98.6%+ of all Android devices 1. The context-aware floating action button, sliding bottom sheet and the themed action bar are based on material design guidelines. The app is compatible with the “new” permission system applicable to Android 6 and above: Devices running Android 6 (Marshmallow) and above use runtime permission requests, while all permissions must be granted at installation time on devices running older versions of Android.

Check out TRM Torun on Google Play

Jul 2016

SEO in Angular with ng2-meta

Updating meta tags such as title and description as the route changes is essential for SEO in any single page application. While building Nomad Couple, an Angular2 site, I realized that there weren’t any Angular2 meta-tags libraries, so I decided to build one. I’ve released it as ng2-meta on npm.

ng2-meta listens to router changes and updates <meta> tags with the values provided in the route’s configuration.

To get started, install ng2-meta

npm install --save ng2-meta

Add a data object to each of your routes and define meta tags (title, description, url etc) relevant to the route.

const routes: RouterConfig = [
  {
    path: 'home',
    component: HomeComponent,
    data: {
      meta: {
        title: 'Home page',
        description: 'Description of the home page'
      }
    }
  },
  {
    path: 'dashboard',
    component: DashboardComponent,
    data: {
      meta: {
        title: 'Dashboard',
        description: 'Description of the dashboard page',
        'og:image': 'http://example.com/dashboard-image.png'
      }
    }
  }
];

Inject Angular2’s Title service as well as ng2-meta’s MetaService into your app. ng2-meta uses the Title service internally to automatically change the page title when the title meta tag is updated.

import { Title } from '@angular/platform-browser';
import { MetaService } from 'ng2-meta';
...
bootstrap(AppComponent, [
  HTTP_PROVIDERS,
  ...
  Title,
  MetaService
]);

Add MetaService as a provider to your root component

import { MetaService } from 'ng2-meta';

@Component({
  ...
  providers: [MetaService]
})

If you’d like to update the page title and meta tags from a component or service, say, after receiving data from a HTTP call, you can use MetaService.

class ProductComponent {
  ...
  constructor(private metaService: MetaService) {}

  ngOnInit() {
    this.product = //HTTP GET for product in catalogue
    metaService.setTitle('Product page for '+this.product.name);
    metaService.setTag('og:image',this.product.imageURL);
  }
}

It’s a good idea to add some fallback meta tags for use by crawlers that don’t execute Javascript, like Facebook and Twitter.

<html>
 <head>
  <meta name="title" content="Website Name">
  <meta name="og:title" content="Website Name">
  <meta name="description" content="General site description">
  <meta name="og:description" content="General site description">
  <meta name="og:image" content="http://abc.com/general-image.png">
 </head>
</html>

The fallback meta tags are used to generate the rich snippet shown when your website is shared on Facebook (Just make sure to add Open graph meta tags). Nomad Couple - Facebook share rich snippet

Check out Nomad Couple as a demo of ng2-meta. Its source code is available here.

I’m currently investigating server-side rendering using angular/universal and plan to update ng2-meta to support it.

Nomad Couple

I’m Indian, and my girlfriend is Polish. We love travelling and we’d like to visit a lot of places, but there are surprisingly few countries that I can visit without a visa. Getting a visa can be tedious. (Quite often, I’ve had to personally visit consulates and submit bank account statements, travel insurance and cover letters along with my visa application form). Finding countries that allow both of us to visit without a visa or obtain a visa on arrival is hard. That’s why it occurred to me to build Nomad Couple, a website that provides information on visa requirements for couples.

Nomad Couple home page

Nomad Couple search results

The site was built as an experiment with Angular2. I set up the repo using angular-cli, a wonderful tool that makes it easy to build an Angular2 site and deploy it on GitHub Pages. Having spent some time in the “Javascript fatigue”-inducing React ecosystem, it’s refreshing to be able to set up a project and get going quickly with angular-cli. (Side note: It looks like Facebook is finally acknowledging how complex it is to get started with a React app by creating its own CLI tool).

At the moment, the site groups countries based on visa requirements and links to WikiVoyage pages. I’d like to provide more information on each country through multiple data sources, the abilitiy to add links and pictures, and a Disqus comments section.

The data for the site was scraped from Wikipedia’s “Visa requirements for X citizens” pages. The source code for the scraper is available here.

Jun 2016

Sending emails from Ghost with Nodemailer and SparkPost

While I personally prefer Jekyll to Ghost in the battle of minimalistic CMS platforms, I recently set up a Ghost blog for work and connected the built-in Nodemailer email module with SparkPost, an email service. Here’s how:

  1. Set up a SparkPost account and verify your sending domain.
  2. Go to SparkPost Accounts –> SMTP Relay and copy the host, port and username.
  3. Under Accounts –> API Keys, select the Send via SMTP permission and generate a new API key. The generated API key will be your SMTP password.
  4. Open up your Ghost blog’s config.js, and modify the production section.
  production: {
    url: 'https://example.com/blog',
    mail: {
      from: '"Example.com Blog" <no-reply@example.com>',
      transport: 'SMTP',
      options: {
        host: 'smtp.sparkpostmail.com',
        port: 587,
        auth: {
          user: 'SPARKPOST_SMTP_USERNAME',
          pass: 'SPARKPOST_SMTP_API_KEY'
        }
      }
    },
    database: {
    ....
    }
  }

You can test your configuration by inviting someone to your Ghost installation. The invitee should receive an email from Example.com blog.

May 2016

Setting up CORS with pre-flight request handling for development use in Node + Express

“Cross-Origin Resource Sharing” (CORS)-related errors are a common occurrence while developing a site with a separate frontend and API backend. While the cors module can set headers and respond to pre-flight requests, I didn’t find any documentation to set it up only in the Node development environment (assuming you don’t want to expose your APIs to requests from multiple domains).

const express = require('express');
const app = express();

if (app.get('env') === 'development') {
  console.log('Enabling CORS');
  app.use(function(req, res, next) {
    res.header('Access-Control-Allow-Origin', '*');
    res.header('Access-Control-Allow-Methods', 'GET,PUT,POST,DELETE,PATCH,OPTIONS');
    res.header('Access-Control-Allow-Headers', 'Content-Type, Authorization, Content-Length, X-Requested-With'); //Add other headers used in your requests

    if ('OPTIONS' == req.method) {
      res.sendStatus(200);
    } else {
      next();
    }
  });
}

//Set up express routes here

This enables CORS for all Express routes and responds to pre-flight OPTIONS requests with HTTP status OK (200) only during development. If you haven’t already set your NODE_ENV to development, you can do so and start your server like so

NODE_ENV=development node index.js